Securing AWS Access and Monitoring Billing: A Comprehensive Guide

DevOps Engineer | System Design lover | Technical Writer
Prerequisites:
Access to an AWS Account with Administrative Privileges.
Basic Understanding of AWS Services and Navigation in the AWS Management Console.
Familiarity with IAM (Identity and Access Management) and Security Best Practices.
Follow for more DevOps and networking, Cloud, API, etc tips and nice content on Twitter (@Alpheus___)
Overview of the importance of security and cost management in AWS:
Security and cost management are critical to operating within the Amazon Web Service ( AWS ) Cloud environments.
In the cloud, security is a shared responsibility between the cloud service provider ( AWS ) and the customer while AWS ensures the security of the cloud infrastructure, customers are responsible for securing their data, applications, and services deployed on AWS. Any breach in security can lead to unauthorized access, data leaks, compliance violations, and reputational damage. Implementing security best practices such as encryption, access control, multi-factor authentication (MFA), and regular security analysis helps protect sensitive data and infrastructure from potential threats.
As we know, for every action there is always an equal and opposite reaction, if you fail to secure your AWS resources adequately you will experience financial loss, legal liabilities, and a loss of customer trust.
Secondly, cost management, AWS provides businesses and diverse organizations with the flexibility to scale their businesses based on demand, but this flexibility can also lead to unexpected costs if not managed efficiently, if proper cost management systems are not put in place, organizations may overspend on resources, leading to budget wastage and financial strain.
Monitoring and optimizing AWS usage and spending can help organizations maintain cost efficiency and maximize return on investment ( ROI).
Billing alarms and monitory usage patterns enable proactive cost management, allowing organizations to identify cost anomalies, so we can optimize resource allocation, and make informed decisions about resource provisioning.
Note, even in our daily lives effective cost management practices contribute to financial stability, enable better budget planning, and ensure that resources are used optimally to support business objectives.
I believe with these points you now know why is seriously important to Setting up Multi-Factor Authentication (MFA) for your AWS account as a whole:
Setting up Multi-Factor Authentication (MFA) for the Root User:
In 2024, the importance of securing the root user account with Multi-Factor Authentication (MFA) remains non-negotiable in Amazon Web Services (AWS) environments.
The root user possesses total access and control over all AWS resources within an account. Therefore, securing this account with MFA adds an additional layer of protection against unauthorized access and potential security breaches, threats, and malicious attacks. Here's a step-by-step guide on enabling MFA for the root user:
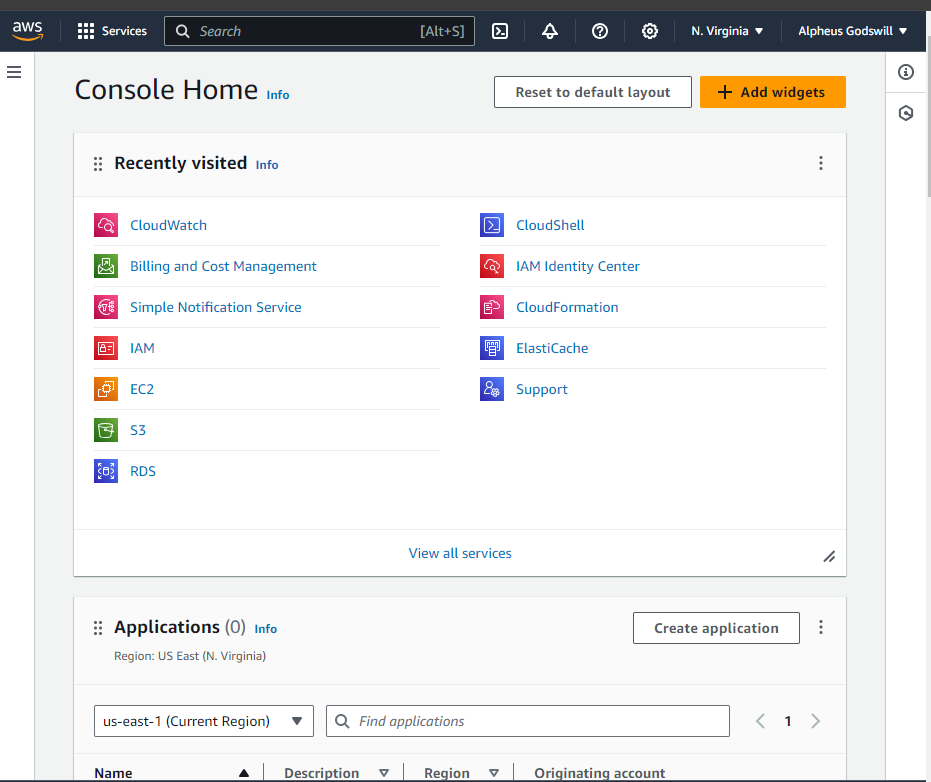
1. Accessing the AWS Management Console:
- Log in to the AWS Management Console using the root user credentials. Your result should be similar to the image below.
2. Navigating to the IAM Dashboard:
- From the console home page, navigate to the IAM (Identity and Access Management) dashboard. You can find it under the "Services" dropdown menu or by searching for "IAM."
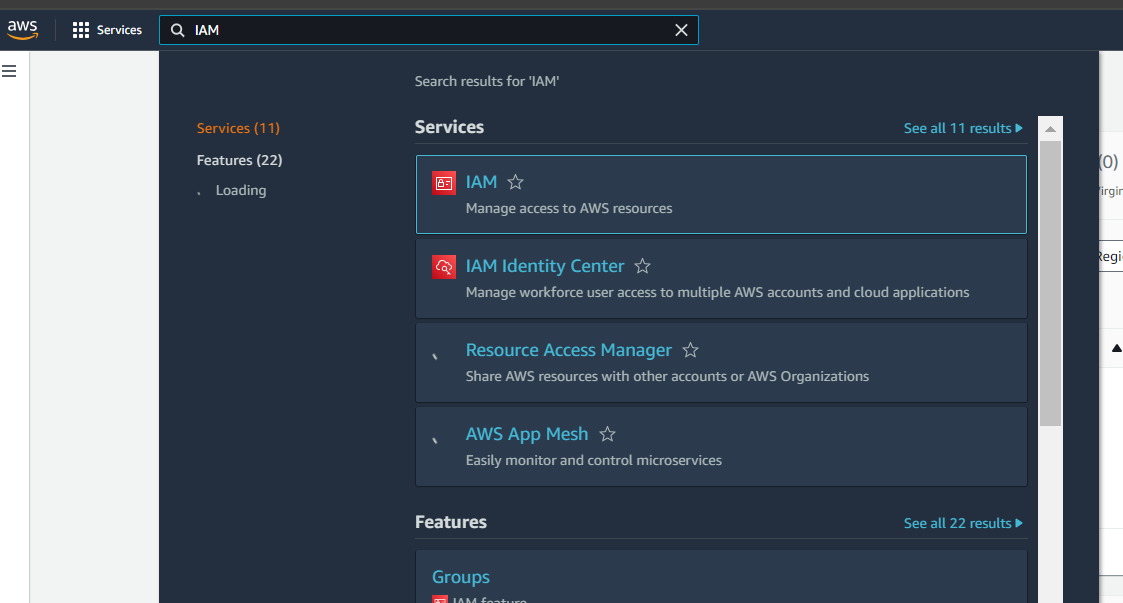
- Click on the “IAM” service.
Disclaimer, my image may not necessarily look like yours, because I have gone through this setup before.
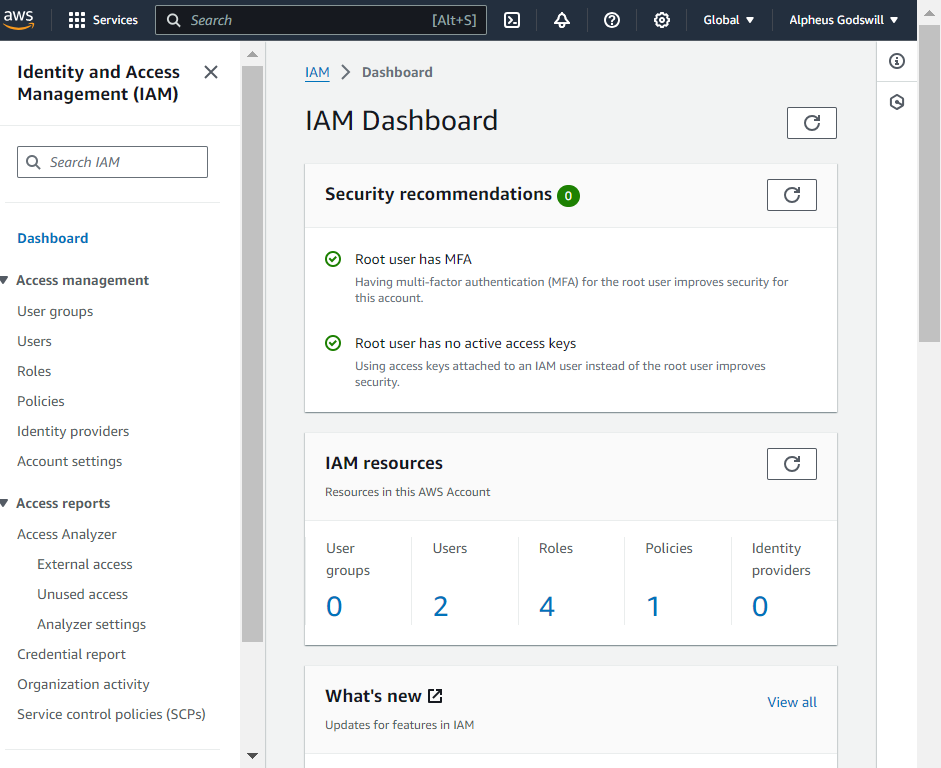
3. Selecting the Root User:
In the IAM dashboard, click on the "Dashboard” tab on the left-hand side.
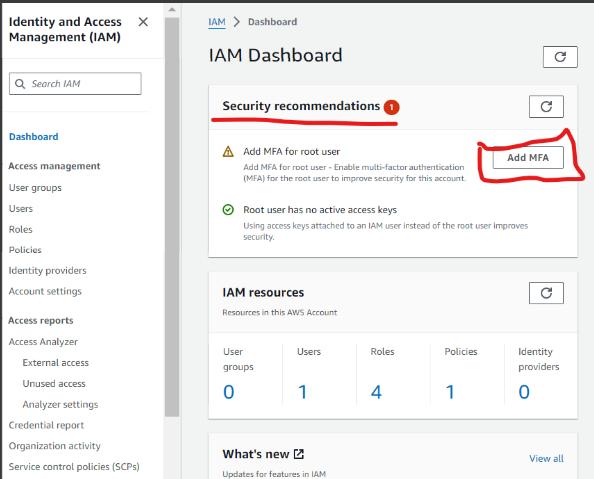
4. Enabling MFA for the Root User:
Within the root user dashboard page, click on the "Add MFA" tab.
Under the "Multi-factor authentication (MFA)" section, click on the "Manage MFA" button.
That will take you to the “security credentials>Assign MFA device “.
In the picture below put the name you will use for the Google Authenticator, yes you read that right, you will need to download a “Google Authenticator” from the play store or app store, mine will be e.g “AlpheusRootUser”
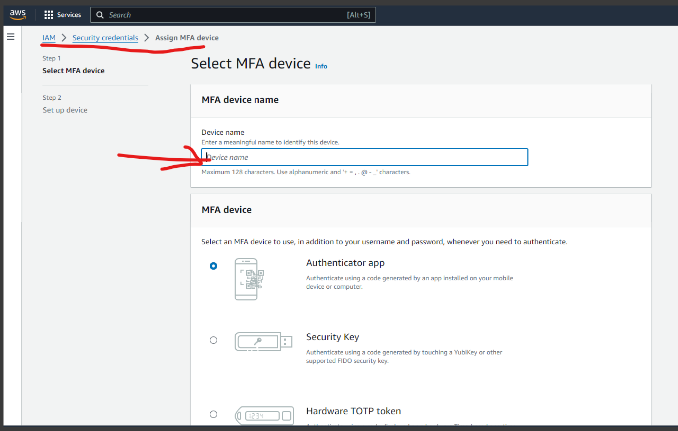
When you follow the above instructions correctly, fill in a name of your choice, and download Google Authenticator.
- Click next, you should see the page below.
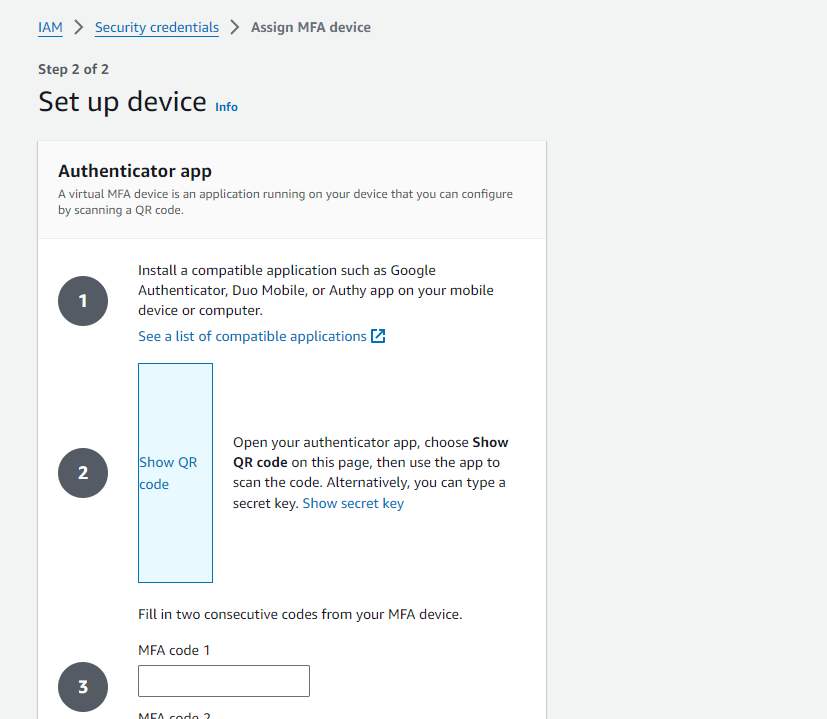
Click “show QR code” copy the code and paste it into the Google Authenticator app you initially downloaded.
Insert the first “MFA code 1” and “MFA code 2”, don’t feel confused, copy the first and second codes, and make sure it is simultaneously followed.
Click “Add MFA”, it’s in orange color.
Return to the dashboard by clicking “dashboard” on the left side of the IAM page.
Click the refresh button circled with a red indicator pen in the image below, and you will see the magic.
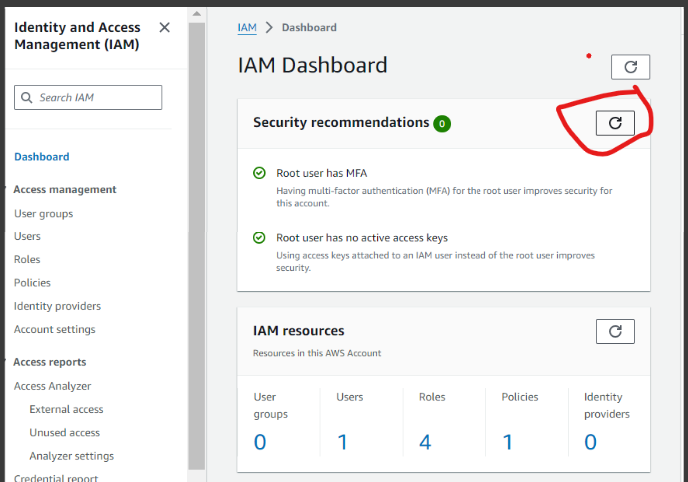
Note you will always be prompted for authentication anytime you try to log in.
Creating IAM Users:
1. Access the AWS Management Console and navigate to the IAM dashboard. ( I trust you know how to do this).
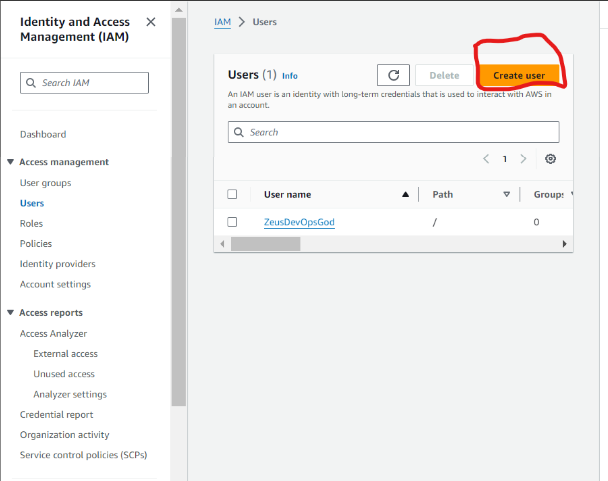
2. In the IAM dashboard, select the "Users" tab from the left-hand menu.
3. Click on the "Create user" button to initiate the user creation process.
4. Enter the desired username for the new IAM user, and click “Next”
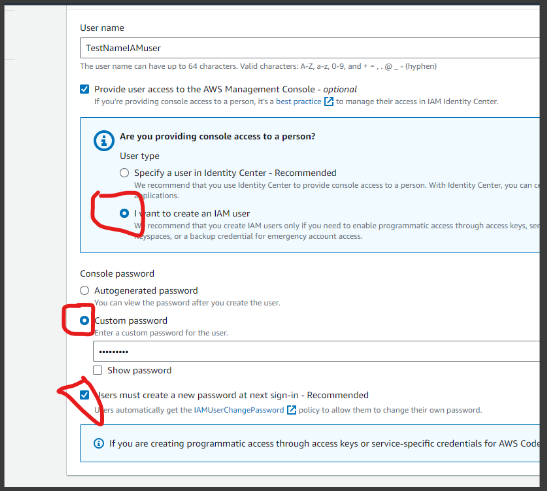
5. Choose the access type for the user, and click the check box circled with red ink:
Programmatic access: Allows the user to interact with AWS services programmatically using APIs, SDKs, or CLI.
AWS Management Console access: Grants the user permission to access the AWS Management Console via a web browser.
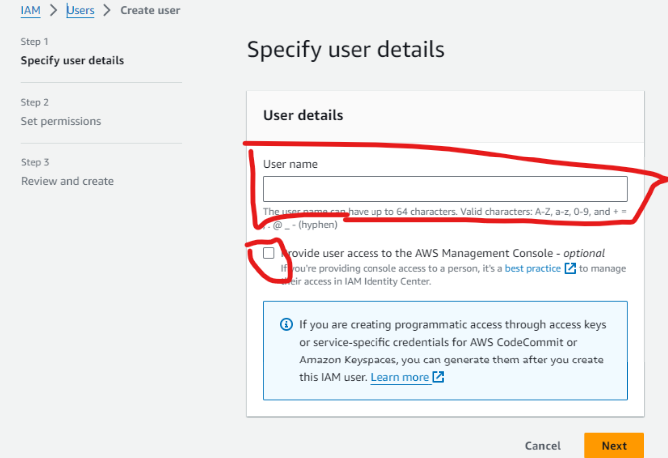
After the above click next
6. Set permissions for the user (Out of the 3 permission options AWS allows we will use the first one which is to attach existing policies directly):
Attach existing policies directly: Assign pre-defined policies that grant specific permissions to the user.
Add user to the group: Add the user to an existing IAM group, which already has a set of permissions associated with it.
Copy permissions from existing user: Copy permissions from an existing IAM user to the newly created user.
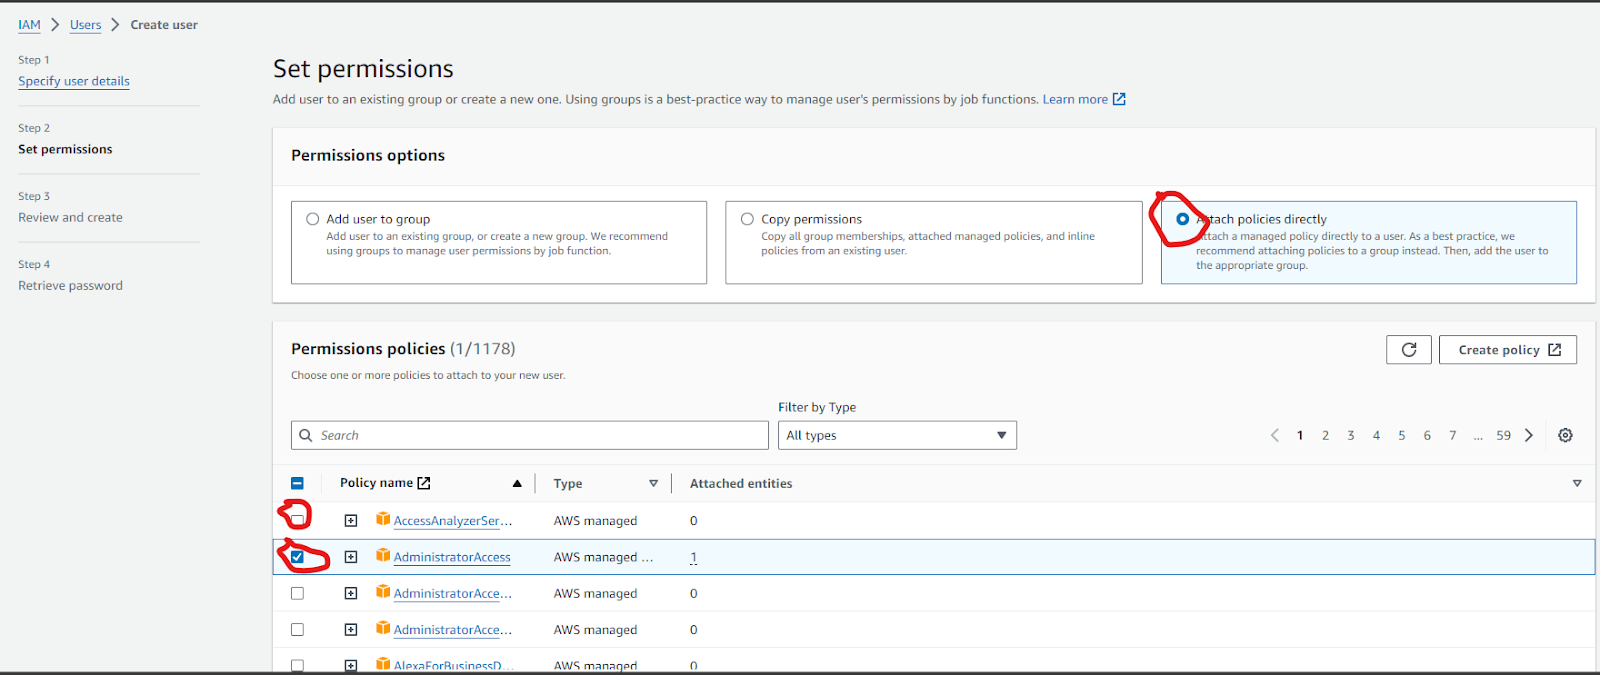
Be very careful with the policies you attach to a user, cost management is very crucial here.
7. Review the user details and permissions to ensure they align with the user's role and responsibilities, and click “ create user “.
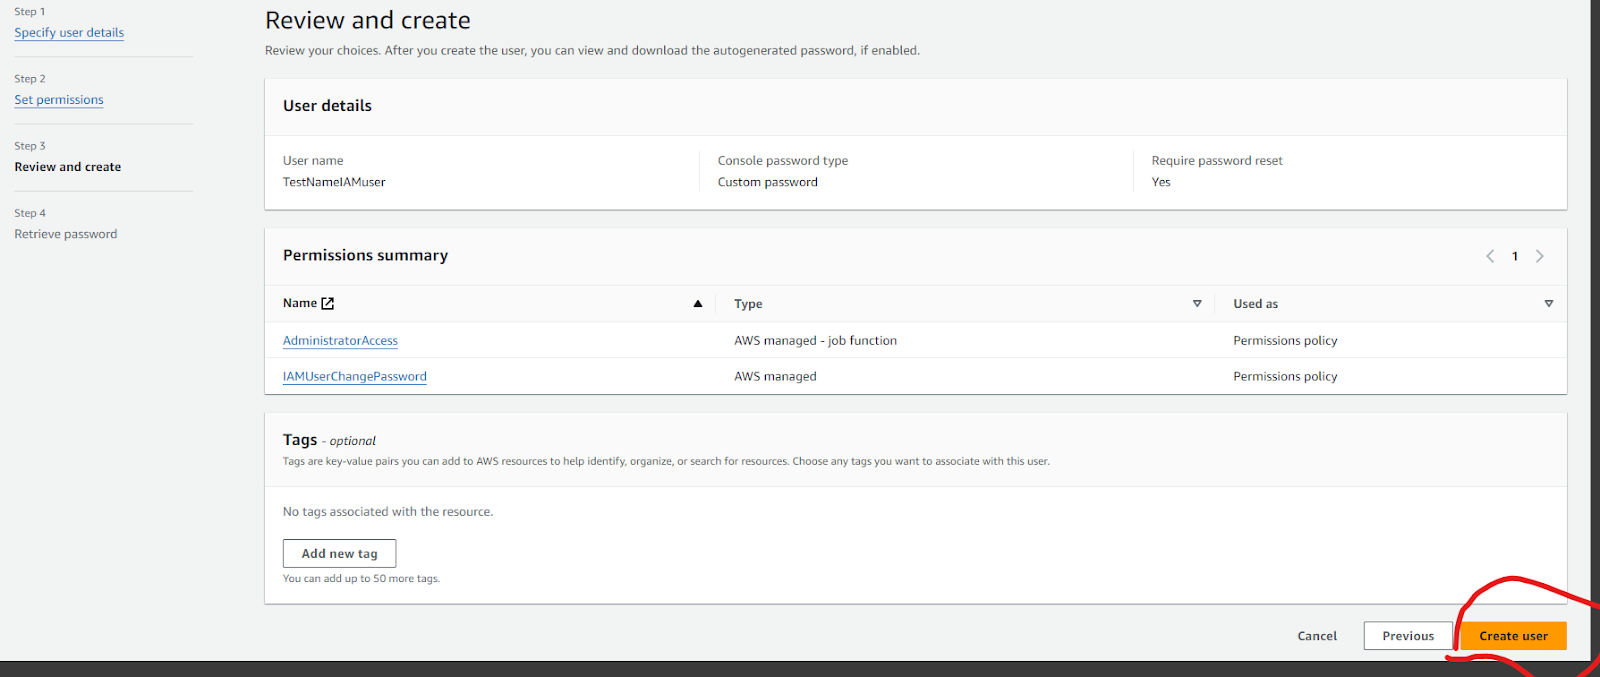
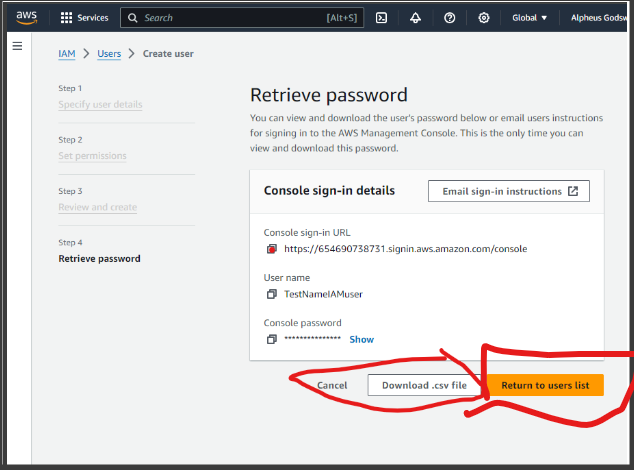
8. Complete the user creation process, and note down the user's access key ID and secret access key if programmatic access is enabled.
Here, download the “.csv file” and keep it safe, it’s your IAM user login details.
Then click “ Return to users list “, so we can create MFA for this user.
Enabling MFA for IAM Users:
1. Access the IAM dashboard in the AWS Management Console.
2. Select the IAM user for whom you want to enable MFA.
3. In the "Security credentials" tab of the user details page, locate the "Multi-factor authentication (MFA)" section.
4. Click on the "Manage MFA" button.
5. Follow the on-screen instructions to choose the MFA device type: virtual MFA device or hardware MFA device.
I guess you know what to do from here because it’s the same instruction as what we did in the root user MFA.
Setting up Billing Alarms:
1. Access AWS Billing and Cost Management Dashboard:
Log in to your AWS Management Console. ( I trust you will use your MFA here)
Navigate to the Billing and Cost Management Dashboard.

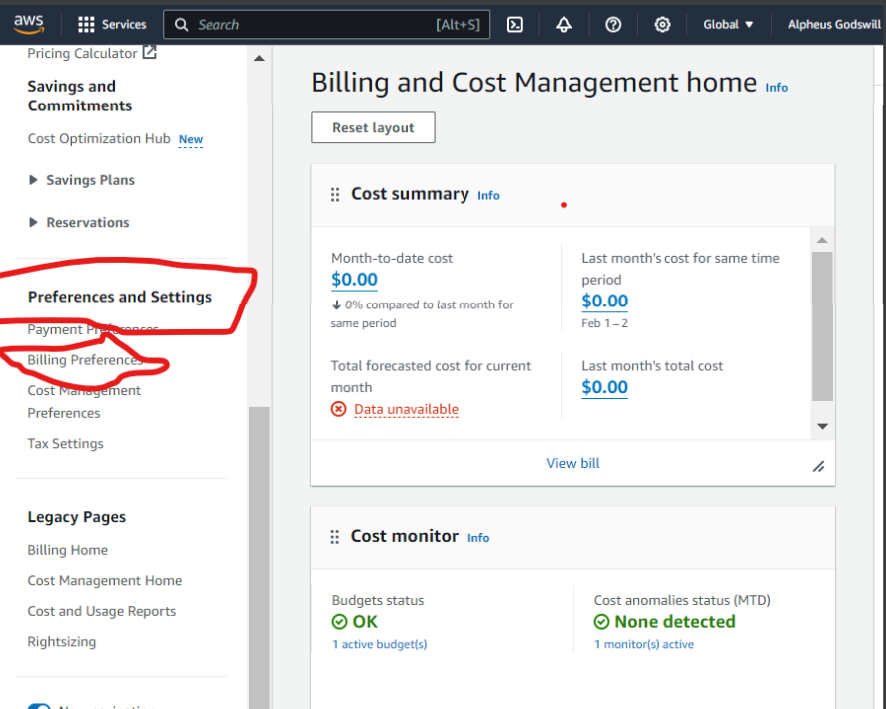
2. Navigate to Billing Alarms ( click on the circled section above, in your AWS console):
- In the dashboard menu, select "Billing Preferences" or "Billing Dashboard." To see this scroll down the “Billing and Cost Management” sections on the left side of your panel
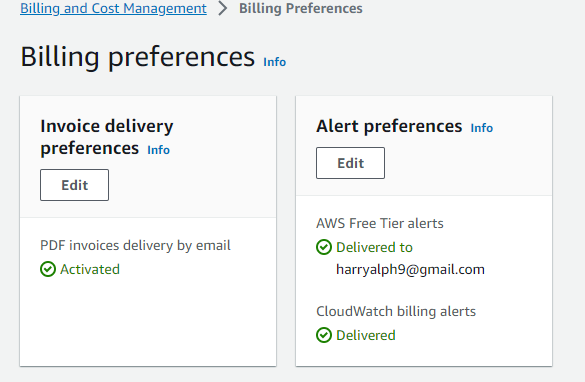
- Under the billing preferences section, click edit for both the (Invoice delivery preferences ) and (Alert preferences). Check the boxes for each and click update
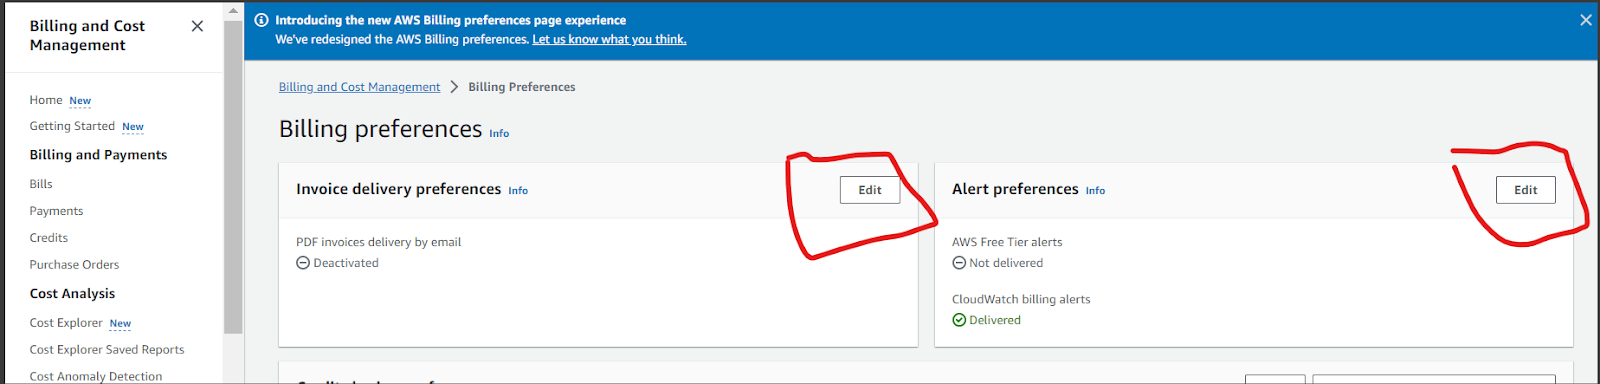
Put you email in the Alert preferences section and click update for each
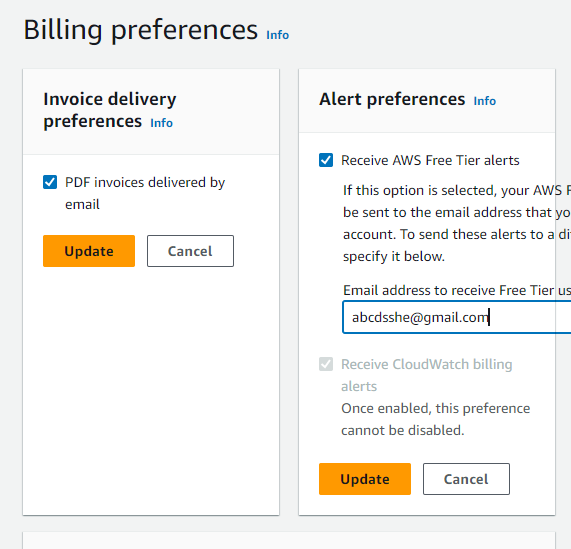
You should see something like the image below
3. Navigate to Billing Alarms:
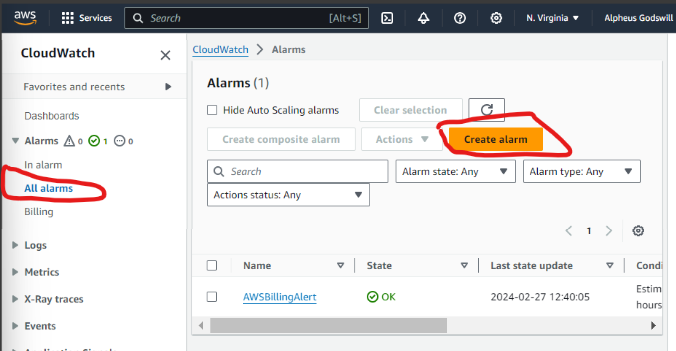
Go back to your AWS console dashboard and search the service “ Cloudwatch”
On your left side of the Cloudwatch dashboard click “ All alarms” and then click “Create Alarm”.
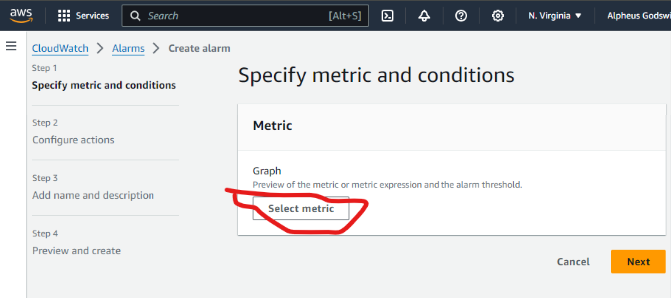
Click “Select Metric”
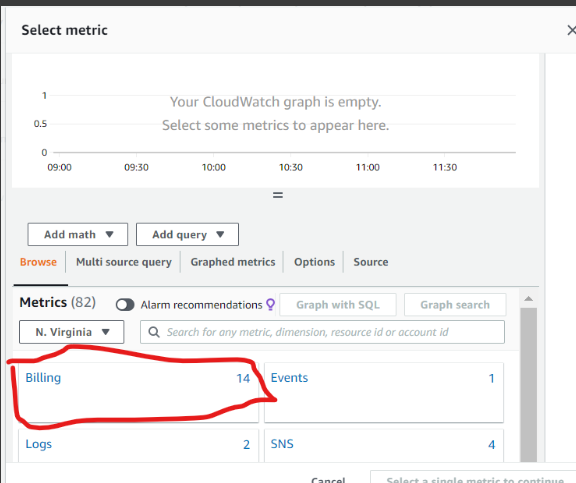
You should see “Billing” if you did the first steps properly 🫠
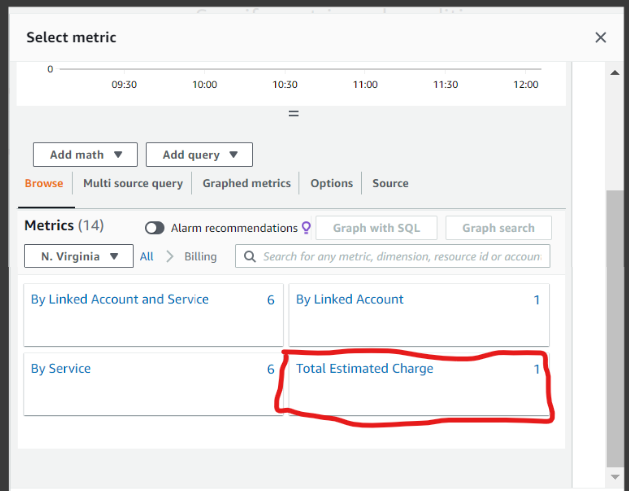
In the next step Click on “ Total Estimated Charge”
Select “USD”
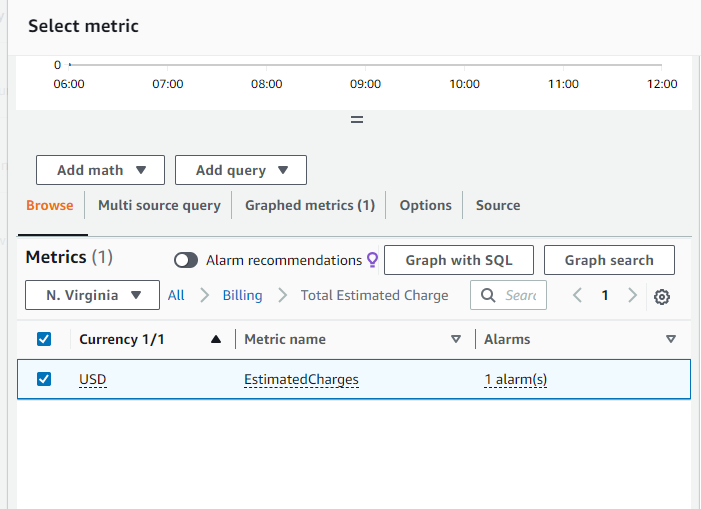
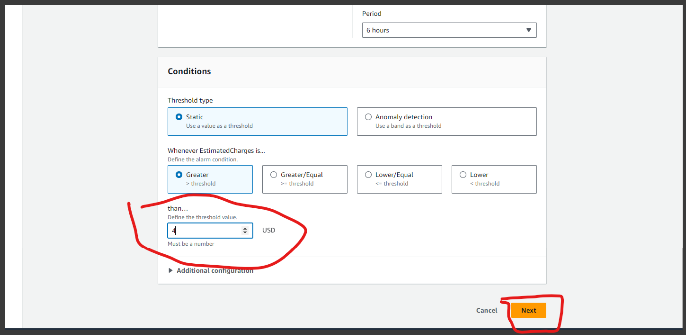
Click “ Select Metric “, leave the default values in the “metric” section as they are, Next, navigate to the conditions section below and input the desired value. You will receive notifications if your usage reaches or surpasses this value. Then click next.
4. Configure Notification Settings:
Choose how you want to be notified when the alarm is triggered. Options typically include email notifications, SNS (Simple Notification Service) notifications, or both.
Enter the email addresses or SNS topics that should receive the notifications.
We are going to configure SNS in this case.
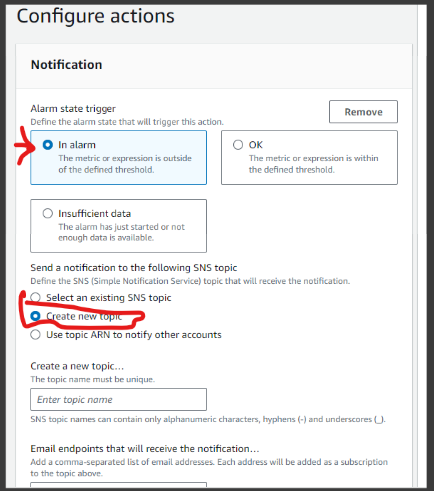
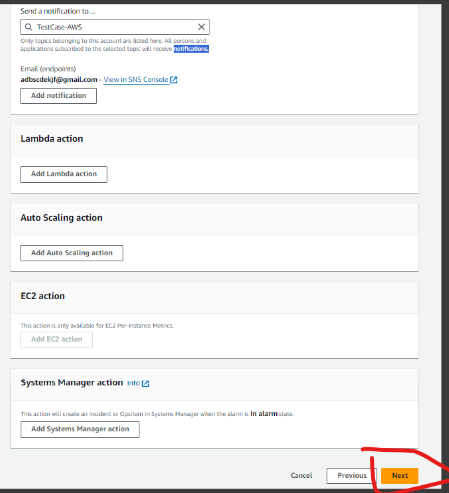
The image above is self-explanatory. We will choose a specific use case in the Notification section labeled "In alarm." Although there are three options available, we will select this one because it aligns with our goal: receiving notifications if our usage of any AWS service exceeds the budget we have set.
Select “Create new topic” and enter the name and email of the topic you want to create.
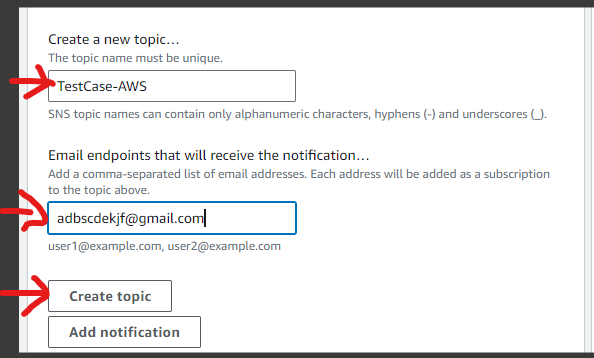
We can create the three(3) notifications but I won’t cover that here, you could reach me on Twitter (@Alpheus___) so I can work you through the process.
Click the SNS topic you just created.
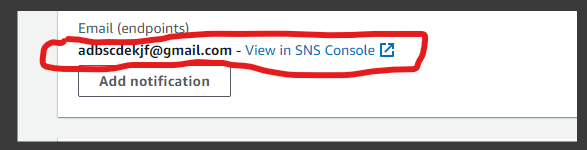
When you do that you should see the highlighted area and confirm it aligns with what you wrote especially your “email” address sections below:
Return to the “Configure actions “ page where you created the SNS topic and click “ Next “
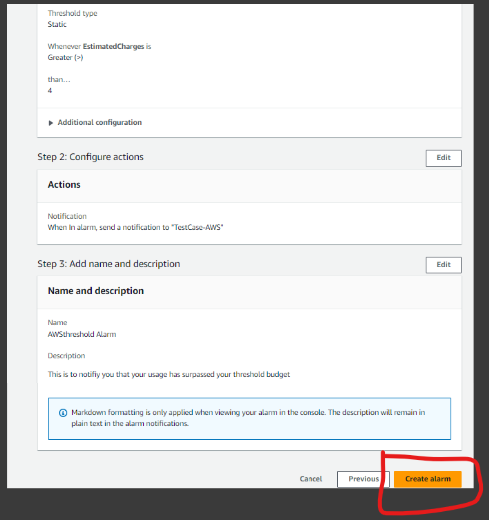
You should see a page like the one below, write an “ Alarm name “ of your choice, and insert an “Alarm description “.

Preview your Alarm and click “ Create Alarm “.
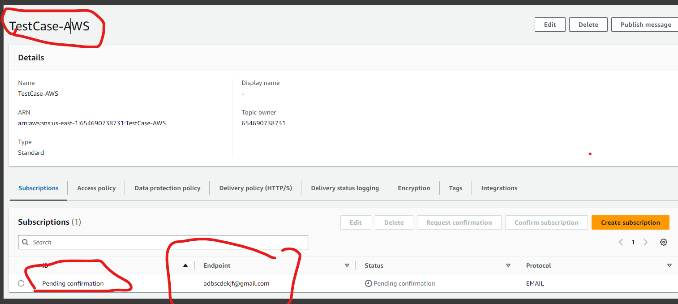
Your Alarm is created but you need to “ confirm your email address “.
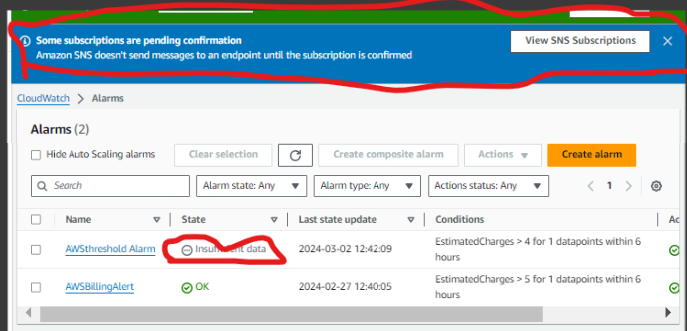
Go and confirm your email address and enjoy your AWS Billing Alarm account as a professional AWS user, it was nice having you around I am (@Alpheus___) on Twitter, ensure to follow me on Twitter for nice DevOps tips and content like this, and have a blessed day.
Conclusion:
IIn summary, implementing Multi-Factor Authentication (MFA) for both Root and IAM users enhances AWS security. Coupled with setting up billing alarms, organizations can effectively manage costs and prevent budget overruns. By configuring notifications aligned with spending thresholds, users receive timely alerts, enabling proactive cost management. This integrated approach ensures robust security measures and optimized resource utilization, fostering a secure and cost-efficient AWS environment


